Let's Set Up Your Monitor Speakers
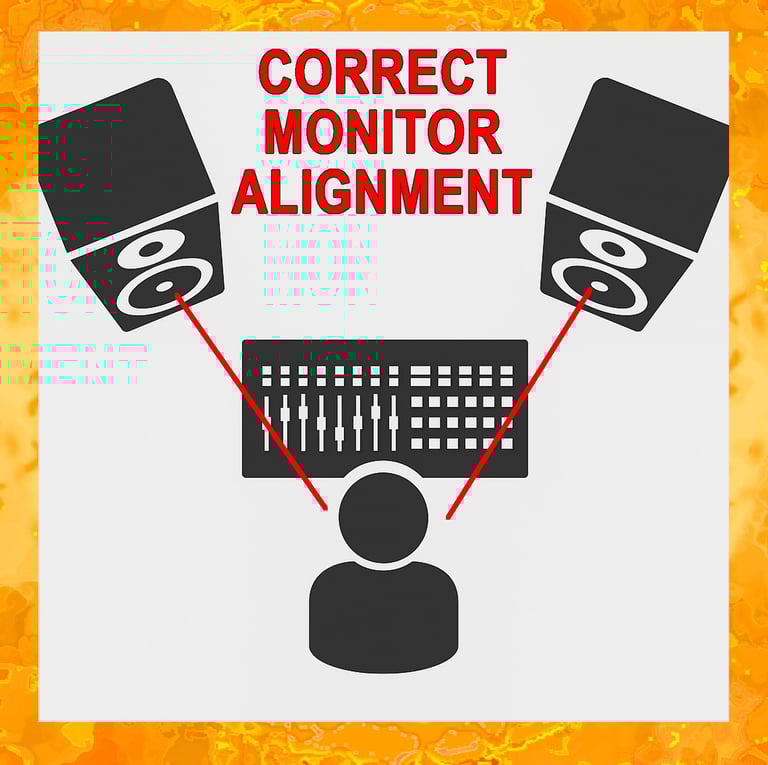
The first illustration shows the correct placement of your studio monitors. The monitors you probably have (similar to the ones recommended on the website) are probably what's known as near-field monitors. They are designed to be most accurate when used at a relatively close distance.
Ideally, there will not be a wall within about 10 feet from either speaker to create unwanted sound reflection. If the wall is closer than that, it would be wise to pad the side walls.
🎵 Frequency Ranges of Vocals & Instruments
Vocals
Soprano: 250 – 1000 Hz
Alto: 200 – 700 Hz
Tenor: 110 – 425 Hz
Bass (voice): 80 – 350 Hz
Woodwinds
Flute: 250 – 2500 Hz
Clarinet: 125 – 2000 Hz
Bass Clarinet: 75 – 800 Hz
Saxophone (Alto): 125 – 900 Hz
Brass
Trumpet: 300 – 1000 Hz
Trombone: 80 – 600 Hz
Tuba: 45 – 375 Hz
Strings
Violin: 200 – 3000 Hz
Cello: 65 – 650 Hz
Double Bass: 40 – 250 Hz
Guitar: 80 – 1200 Hz
Keyboard
Piano: 27 – 4200 Hz
Percussion
Kick Drum: 50 – 100 Hz
Snare Drum: 100 – 250 Hz
Cymbals: 300 – 15000 Hz
🎧 Understanding Frequency Ranges
Every instrument and voice lives in its own “home zone” of the frequency spectrum. Knowing these ranges helps musicians, producers, and engineers avoid clashes in a mix, carve out space with EQ, and bring clarity to a performance. Think of it as a map of where each sound naturally sits — from the deep rumble of a tuba to the shimmering highs of cymbals.
🧠 How You Can Use This
Mixing engineers: carve EQ space by knowing where instruments overlap.
Musicians: understand your instrument’s “home zone” in the spectrum.
Educators: teach pitch and arrangement using clear ranges.
🎙️ Building a Solid Recording Foundation
Start with a click. A good recording is built like a house — it needs a strong foundation. Use a click track or stick clicks from the drummer.
Match the time signature.
4/4 → at least 4 clicks before the intro
3/4 or 6/8 → at least 6 clicks before the intro
Copy that same click track to every session track for mixdown consistency.
Lay rhythm first. Begin with your basic rhythm tracks. Add a “scratch vocal” so musicians know where they are in the song. Replace it later with the final vocal. Keep EQ and effects minimal at this stage.
Working solo? If you’re using a drum machine, record it alongside a rhythm instrument (like guitar or keys) to anchor the track.
Sweeten carefully. Add bass, fills, or leads — but remember: less is more. Don’t crowd the arrangement just because you have extra instruments lying around.
Respect realism with synths. Play them as real musicians would. For example, horns and winds can only play one note at a time. Layer parts individually, and allow subtle timing variations for authenticity.
Pause and review. Take breaks, listen critically, and fix mistakes early. Don’t rely on “we’ll fix it in the mix.”
Check at different volumes. Loud playback can hide errors. Listen at low and medium levels to catch details and protect your ears.
Test outside the studio. Burn a CD or copy to a thumb drive, then play it in your car stereo. If it sounds good there, you’re ready for final vocals.
Finish strong. Record lead and background vocals (or lead instrument for instrumentals).
Final check. Repeat the car test — if the blend works on a consumer system, you’ve nailed it. 🎉